-
Capacitors Blog Categories
-
Capacitors Blog Contact
- Fax #: 852 8208 6246
- Email : info@capacitors.hk
Car Audio Capacitor
The audio system in our cars is an assortment of different parts. Each and every part in the system performs a specific function. It is with the co-ordination of all the parts, that you can hear the system play those fantastic tracks as you drive along. In the entire system, car audio capacitors have a significance of their own, Above about "Car Audio Capacitor" information content.
What are car audio capacitors?
Car audio capacitors are basically power storages in the car. These capacitors accumulate that power which is essential for the amplifier to produce great sounds. You can hear the booming bass sounds and songs with that much needed punch only because of audio capacitors. Car audio capacitors are also known as stiffening capacitors, Above about "Car Audio Capacitor" information content.
More on car audio capacitors
- Audio capacitors accumulate power whenever it is not required. This power is released when the demand for power exceeds the supply capacity of the power system of the car.
- Audio capacitors are necessary to supplement the regular power supply of the car in order to ensure the smooth functioning of the amplifier. Car audio capacitors usually range from 0.5 farads to 3 farads.
- You have to install a car audio capacitor that complements your amplifier. It is also necessary to place the capacitor as near as possible to the amplifier. For 500 RMS of power output, it is necessary to have an audio capacitor of 0.5 farads.
- There are also digital audio power capacitors. These can also be installed in cars. A digital audio capacitor (usually from 1.5 farads) consists of a turn on and turn off circuitry along with a 24-volt DC.
If you car lights dim when your car audio system produces a deep bass note, then your amp will be greatly helped with a car audio capacitor, Above about "Car Audio Capacitor" information content.
Car Audio Capacitor Installation
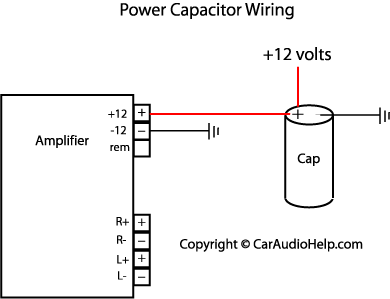
There is often a lot of confusion on how to wire a car audio capacitor (a.k.a. power capacitor or Stiffening™ capacitor). There are two terminals on a car audio capacitor. A positive and a negative. The negative terminal is connected to ground. The positive terminal is connected "in-line" with the car audio amplifier +12 volts terminal. See the diagram below.

Ideally the power capacitor should be as close as possible to the amplifier. Within a couple of feet is acceptable.
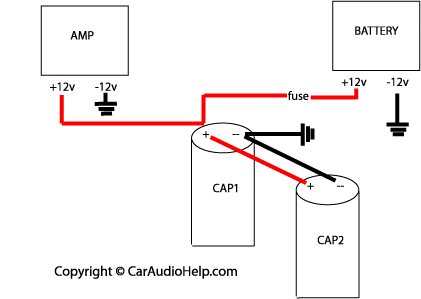
Here's how to wire two capacitors in a system.

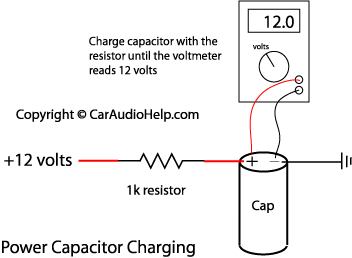
NOTE OF CAUTION: Power capacitors store a large amount of energy and they charge very quickly. You must first "charge" your power capacitor using a resistor before connecting it directly to +12 volts. This is done with the a 1k ohm resistor and a voltmeter. The exact value of the resistor is not critical but I would keep it in the 500-1k ohm range. I would recommend getting a 1 watt resistor if possible (your capacitor may have come with a resistor for charging). A lower wattage resistor will heat up too quickly. Also, do not hold the resistor with your bare hand. The current flowing through the resistor will cause the resistor to heat up and you could be burned. A good place to put the resistor is in the main power wire fuse holder. Simply substitute the resistor for the fuse. A diagram for the capacitor charging setup is shown below. You will need to place a voltmeter across the capacitor to monitor the voltage. Once the voltmeter reads 12 volts you can remove the voltmeter and replace the resistor with the power fuse, Above about "Car Audio Capacitor" information content.
Alternatively you can measure the voltage across the charging resistor. It should start around 12 volts and slowly work its way down to 0 volts. When the voltage stops changing you have charged the capacitor completely, Above about "Car Audio Capacitor" information content.
